 Vector and Rasters are two different graphics for design. We even differentiate them on a recent article. In creating designs and illustrations, Why not use them both? Each has their strengths and combining them can make awesome outputs.
In this post we’ll feature over 20 of the best tutorials that uses both Vector and Raster to create amazing results.
Create a Spectacular Flaming Meteor Effect on Text

Take typography one step further by having text falling from the sky in a burning inferno.
Design Soft Stylized 3D Type

In this tutorial, I will teach you the basics of creating polished 3D type using Illustrator and Photoshop.
Real-world effects

A tutorial showing how to put your vector creations out into the real world, using Photoshop and Illustrator to combine the illustrations in your head with realism.
How to Combine Pixel and Vector to Produce Striking Artwork

Here you will find a step by step guide of how combining pixel and vector elements were put to use to make this Snowboarder artwork.
Design a Sin City Style Poster

Learn how to create the Sin City style effect in Photoshop, and also use Illustrator to create the perspectives and text.
Retro Geometric Vectors in Space with Illustrator and Photoshop

In this tutorial It will show you how to create an abstract image for a poster using Illustrator for the vectors and shades then in Photoshop we’ll give to the image a nice retro style using some textures and brushes.
Swirl Mania in Illustrator & Photoshop

Learn some very powerful techniques that will allow you to easily make tons of different styles of swirls and crazy sperm vectors.
Design a Rocket-Powered Retrofuturistic Digital Illustration

We’ll be making the 3D typography in Illustrator, then use Photoshop to create an out-of-this-world digital illustration on the topic of space exploration.
Crazy Cool Vectors in Illustrator and Photoshop

In this tutorial I will show you how to create a very nice image inspired by the amazing work of Andy Gilmore.
Reflective surfaces

There are numerous ways to simulate chrome in Photoshop, but by reflecting an ‘environment’ into your artwork using Illustrator and Photoshop you can really make it shine.
Super Cool Abstract Vectors in Illustrator and Photoshop

In this tutorial I will show you how to create a abstract sort of flower using the Blend Tool in Illustrator then playing with it in Photoshop to produce a very colorful wallpaper.
Creating the new retro

Graphic designer James White shows you how to give retro-style graphics your own modern-day spin
Create a Dream Design with 3D Typography

Crete a 3D Typography based design. All the elements will be revolving around concept of dreaming
Create a Bright Retro Grunge Vector Illustration

Follow these steps in Adobe Illustrator and Photoshop to create a range of vector shapes and graphics that can be combined into a great looking vector collage illustration.
Trendy Geometric Lines Design Tutorial

Create vector based geometric lines in Illustrator then adding brush textures in Adobe Photoshop resulting in a cool and trendy design style.
Pixels and vectors

Create an illustration using a background and importing vectors as smart objects in Photoshop.
Iron Man View Interface Effect in Photoshop

Learn how to create the Iron Man screen interface.
DIY vintage T-shirts

Learn how to create your very own traditional American collegiate T-shirt design.
Going Round in Circles

Create intricate circle patterns design using radial techniques in Photoshop and Illustrator
How to make retro/futuristic curves in 10 Steps

Create a space like scenery with the glowing lines using Illustrator and Photoshop.
Learn How to Digitally Paint an Underwater Galaxy

Create an underwater galaxy scene using Photoshop and a little illustrator.
Your Turn
What tutorials listed above have you tried? Share your works on our Flickr Pool.
Join 350-030 profession web design classes to learn different graphics techniques and become expert 646-204 using tutorials and 70-649 demos related to vector-and-raster designs.
Vector and Rasters are two different graphics for design. We even differentiate them on a recent article. In creating designs and illustrations, Why not use them both? Each has their strengths and combining them can make awesome outputs. Today is Easter Sunday, and like we all know Easter Eggs and Easter Bunny is what first comes to our mind. In this tutorial, we’ll be making a Cute Easter Bunny using just the basic shapes and a variety of simple tools, making it a good start for Illustrator beginners. We’ll also be using some basic gradients, color tools and the Pathfinder with a step by step instructions.
Try to create a Easter Bunny now using this tutorial and send it to your friends and relatives!
Final Image Preview
Below is the final image we will be working towards in this character creation tutorial targeted at the beginner to intermediate Illustrator user.

After opening up Adobe Illustrator, create a new document. For this project the size of the document doesn’t matter at all, Illustrator has a vast area of artboard beyond the document edges that can be used.
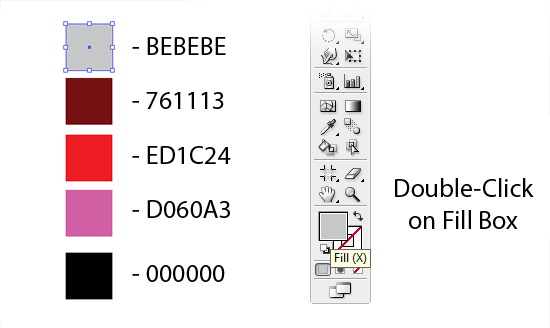
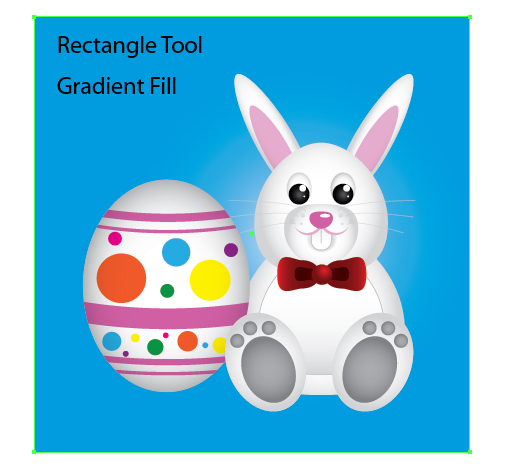
First, Lets create some Rectangles for the colors we will use. Using the Rectangle Tool (M) create the rectangles and Edit the Fill by double-clicking the box and filling in the hex value or # in Color Picker.
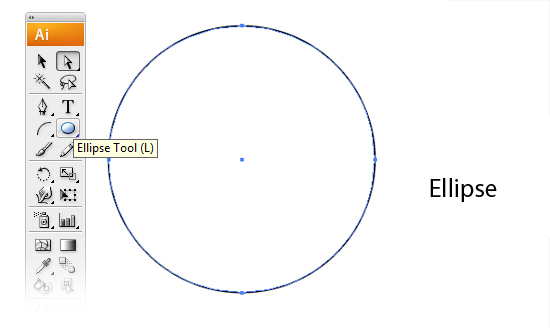
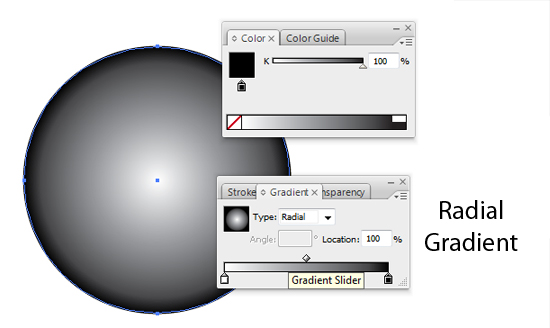
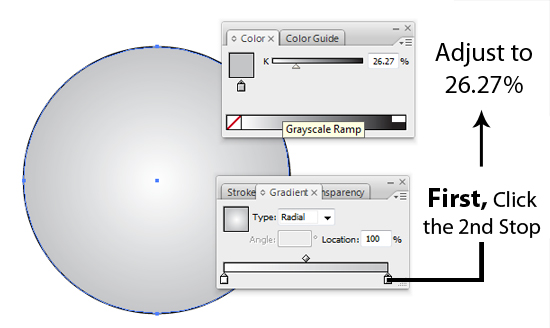
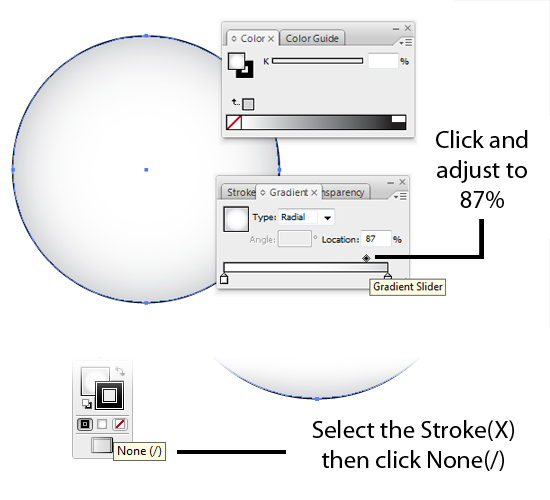
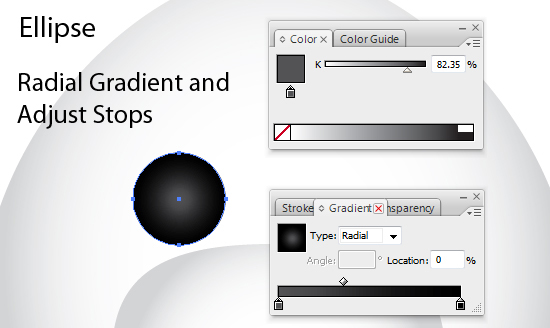
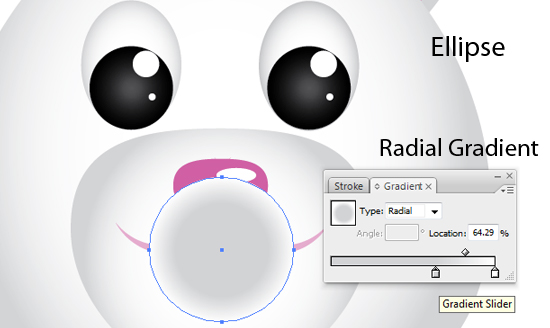
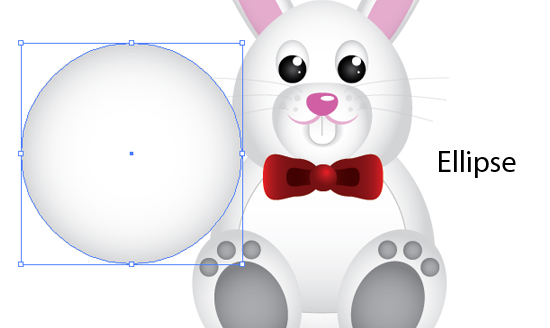
Create an ellipse with the Ellipse tool (L). With the ellipse selected, create a radial gradient from the gradient panel. Make the first Color Stop in the radial gradient white and the second Color Stop by holding Shift and using the Eyedropper Tool(I) select the Color with a Hex Value of #BEBEBE. Within the gradient panel, click on the Midpoint Indicator on the Gradient Slider and move it right, adjust to 87%. Remove the Stroke if there is by Clicking the None(/) on the toolbar below it.
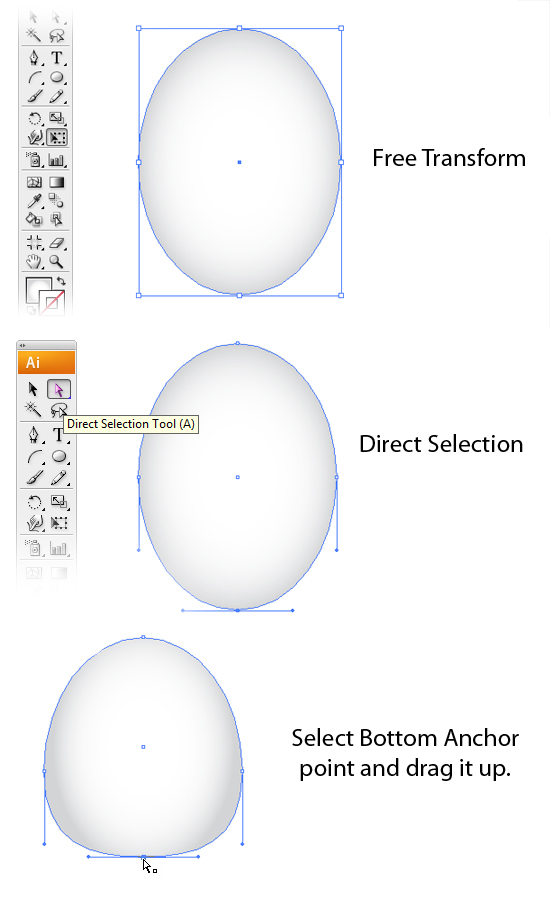
Next, with the Direct Selection tool (A), select the bottom anchor point of the ellipse and drag it up about one fourth the way up the ellipse.
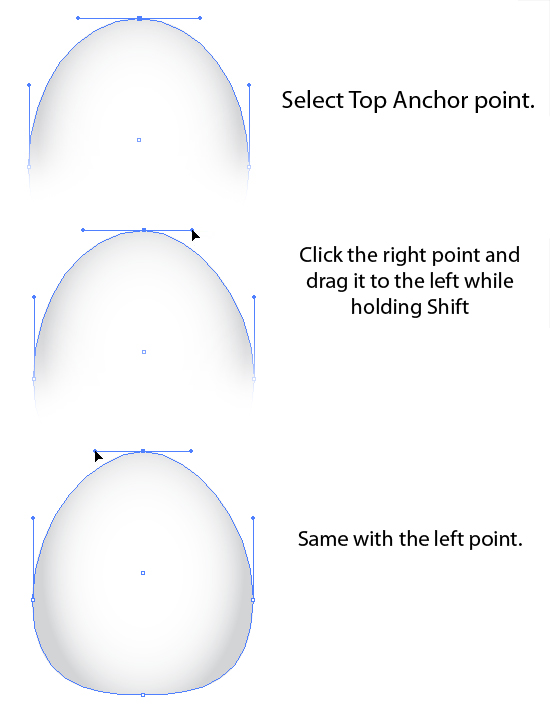
Select Top Anchor Point. Click the Right Point and Drag it to the right while holding Shift. Same goes with the Left Point.
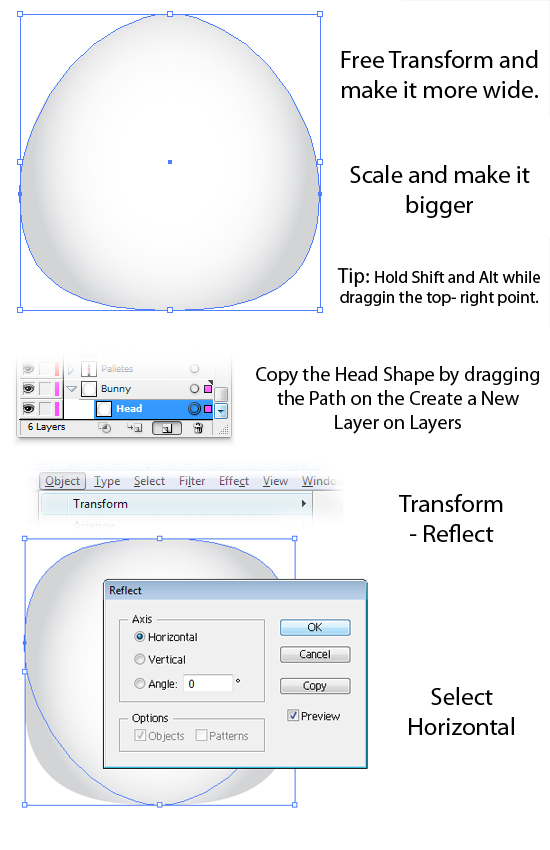
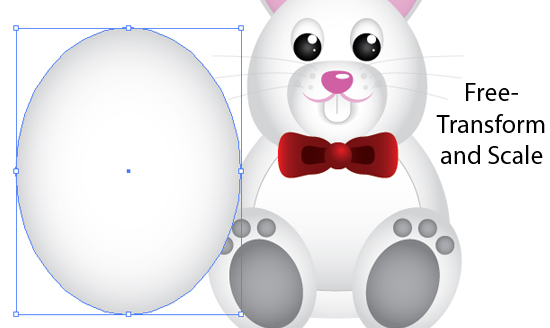
With the Path Selected, Free Transform it and make it more wider. Hold Shift + Alt while dragging the corners to scale it from the center. Copy the shape again by dragging the Path on the Create a New Layer on the Layers Tab. Making a duplicate path. On the Menu Bar, Click on Object > Transform > Reflect. Then on the Reflect Settings, select Horizontal.
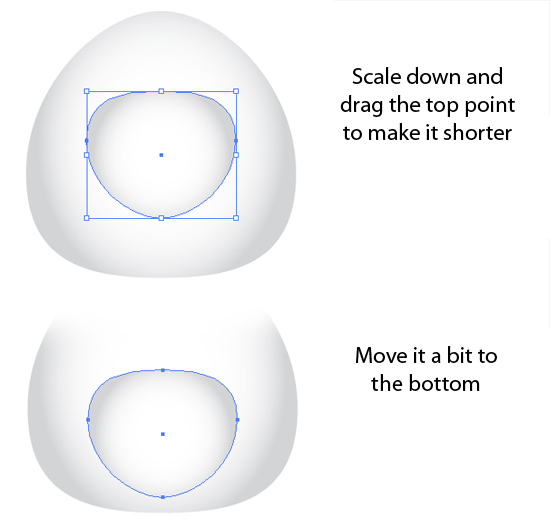
Scale it down and make it more shorter and flat by dragging the Top Point down. Move it to the bottom.
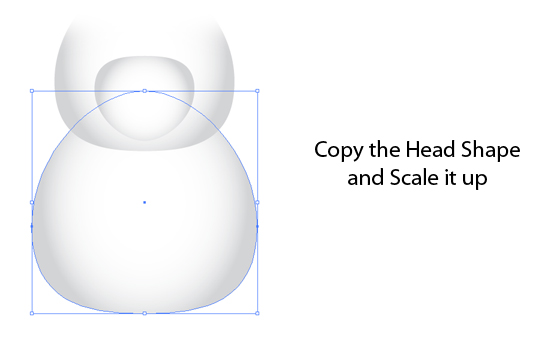
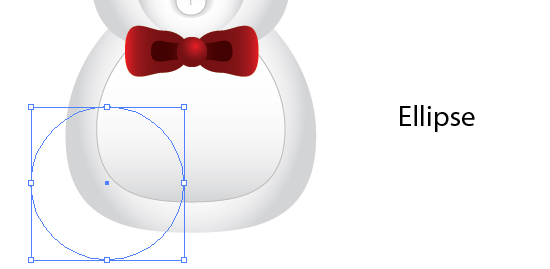
Copy the Head Shape and make it more bigger by using the Free Transform Tool.
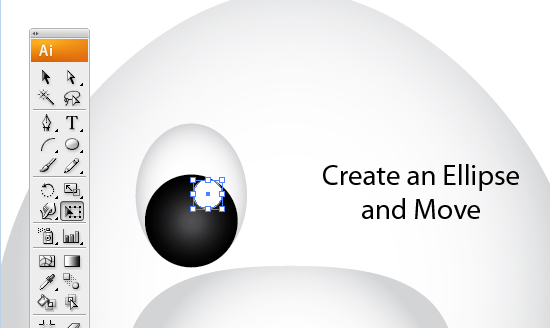
Create an Ellipse for the Eyes and add a Radial Gradient.
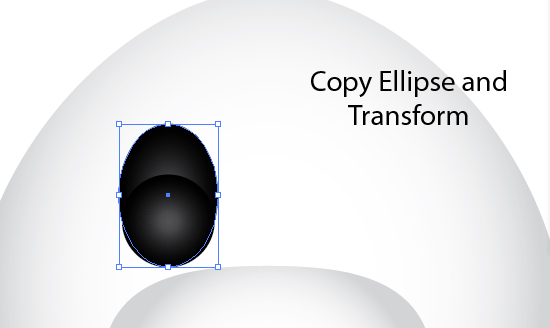
Copy and Paste it at the back of the Path. Free Transform and make it wider. Use the Eyedropper Tool and point it on the Head Shape.

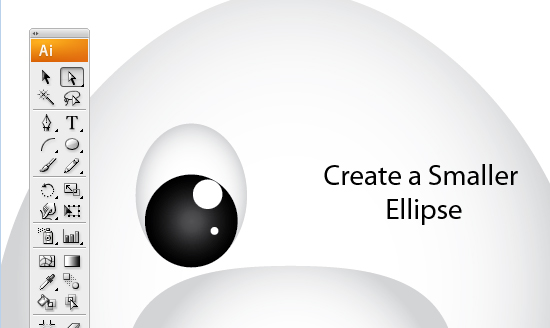
Create another Ellipse with White Fill and move it. Then Create another Smaller Ellipse.
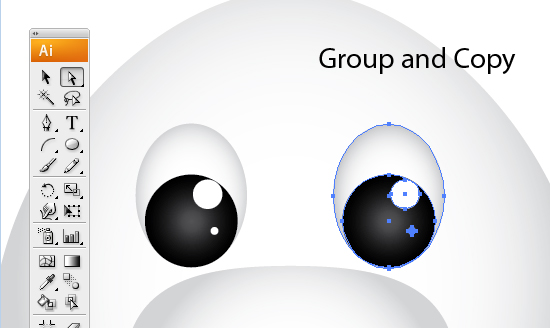
Select the Paths for the Eyes.
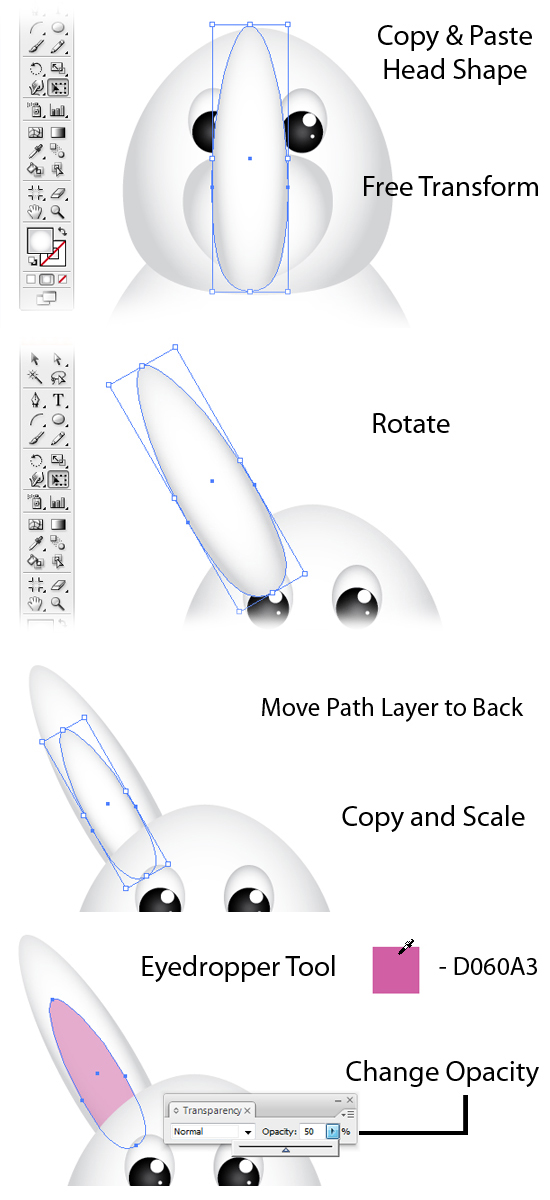
Copy and Paste the Head Shape. Free Transform and make it more Narrow. Rotate Counter-Clockwise. Send the Path at Back under the Layers Tab. Copy and Paste the Path and Free-Transform and Scale it down.
Use the Eyedropper Tool and Pick the Pink Pallete(#D060A3) we made on the First Step.
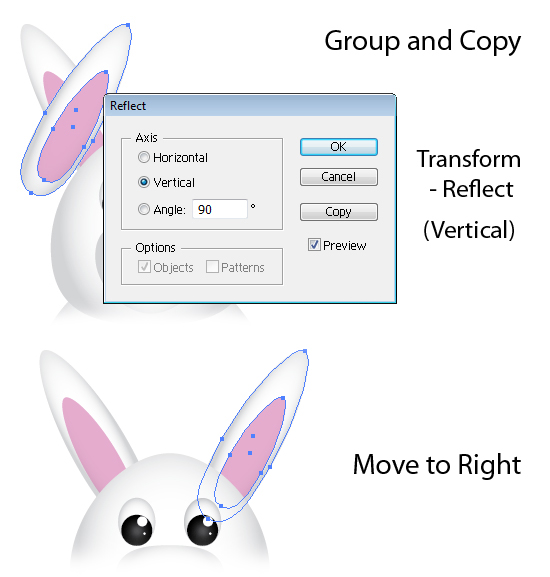
Select the Paths that made up the Ears.Group them and make a copy. Transform > Reflect and select the Vertical. Then move it to right side to make the Right Ear.
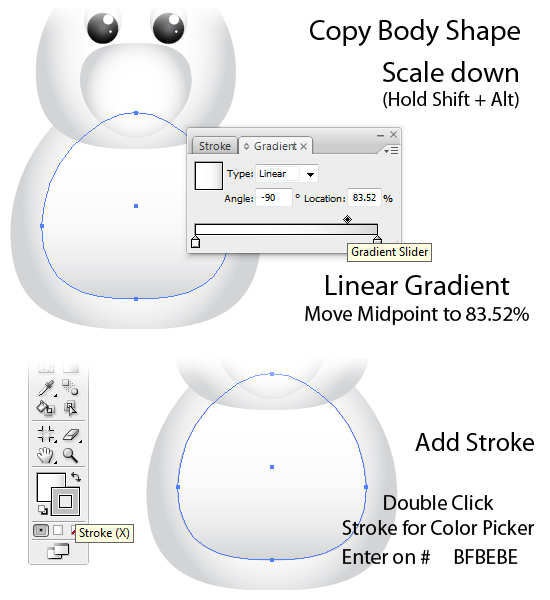
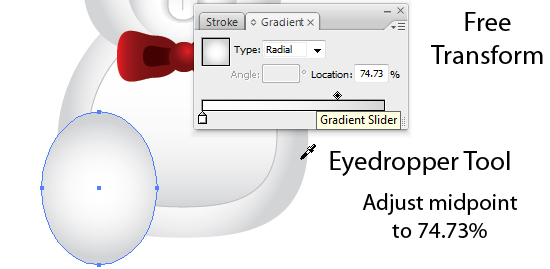
Select the Body Shape Path and make a Copy. Scale it down and make the Radial Gradient to Linear Gradient. Move the midpoint to 83.52%. Add a Stroke and Enter the #BEBEBE on Color Picker.
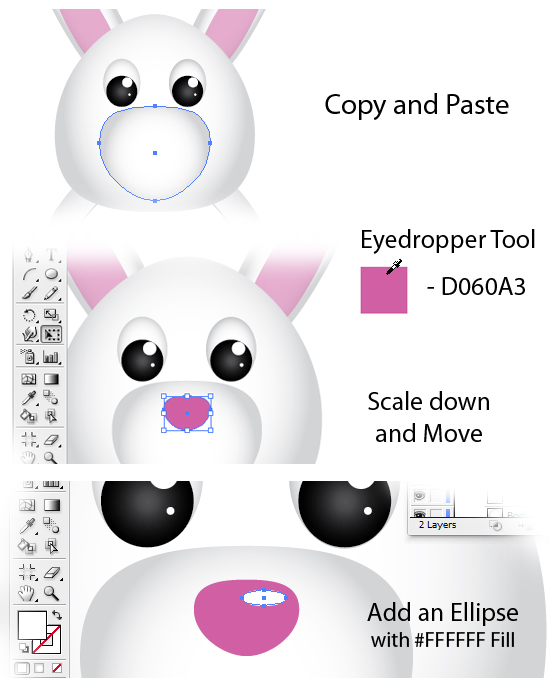
Copy the Nose-Body and Free-Transform. Use the Eyedropper Tool and pick the Pink Pallete. Scale it down and try making it more flat. Add an Ellipse with White Fill.
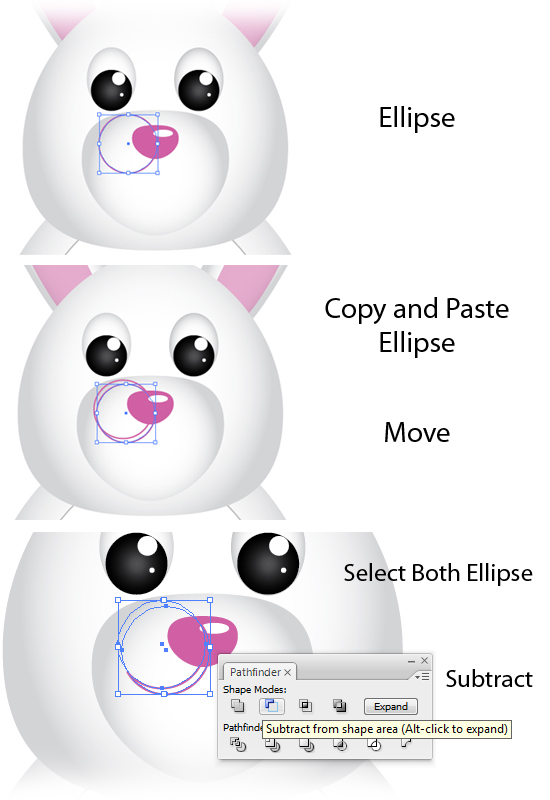
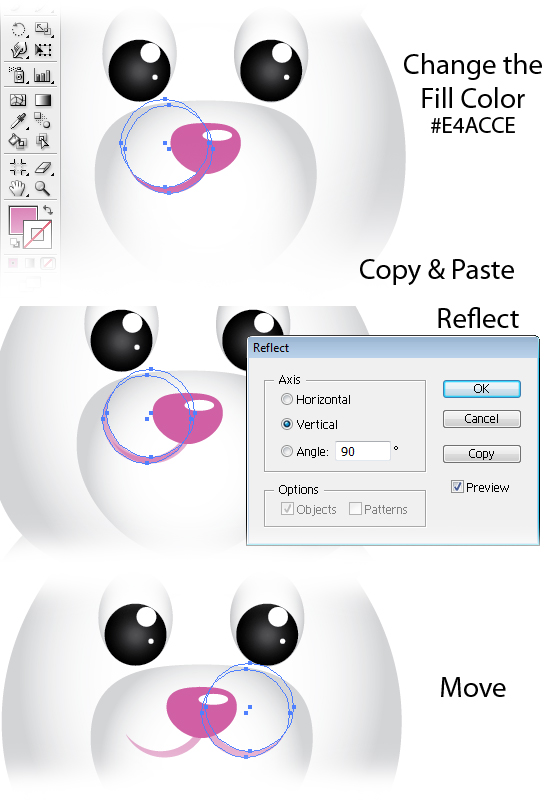
Create an Ellipse and make another Copy. Move it a little to the Right. Select Both and use the Pathfinder. Subtract it from shape Area.
Change the Fill Color to #E4ACCE. Make a copy and Transform > Reflect. Select Vertical. Move it to the Right.
For the Teeth, Using the Round Rectangle Tool. Place it on the center of the Nose.
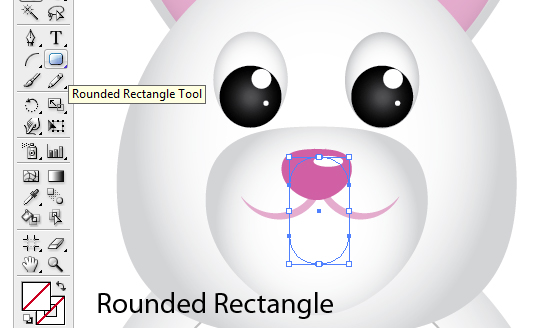
Use the Eyedropper Tool and Pick on the Head Shape. Add a stroke of Grey and change it to Linear Gradient. Move midpoint to 57.69%.

Create 2 Ellipses.
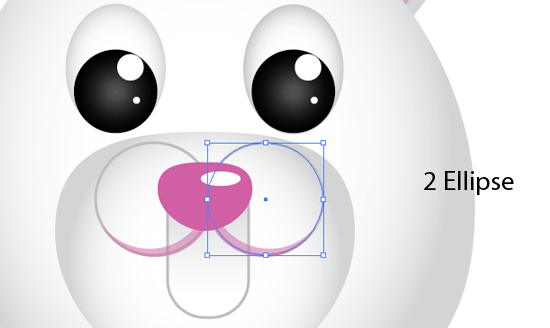
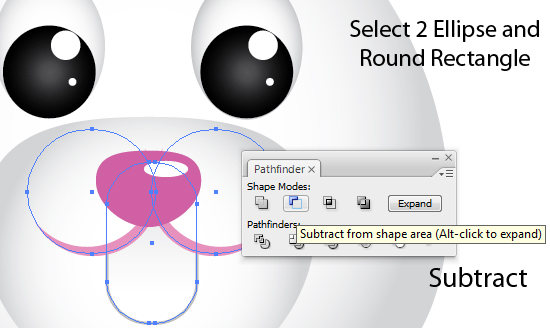
Select the 2 Ellipses and the Round Rectangle. Make sure the Round Rectangle is on the bottom of the 2 Ellipse on the Layers. Use the Path Finder and Subtract.
Add a Line using the Line Segment Tool on the Middle of the Teeth. With a Stroke of Grey.
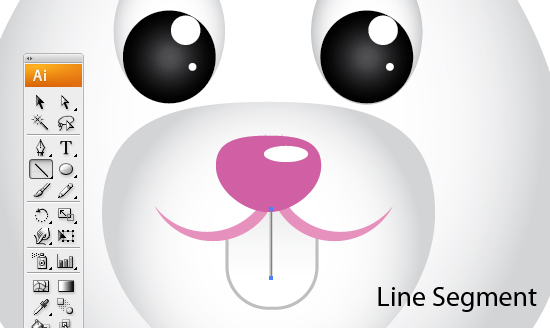
Creat an Ellipse and Add a Radial Gradient. Make the 2nd stop White while the 1st stop a Grey. Adjust Midpoint to 64.29%.
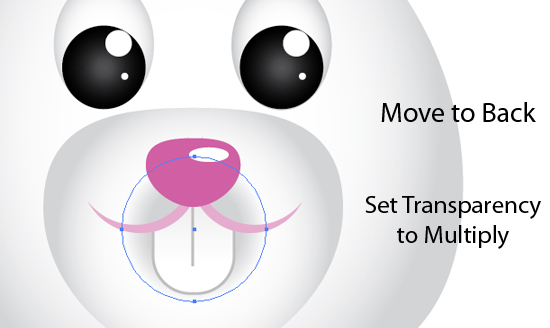
Move it to Back and Set Transparency to Multiply.
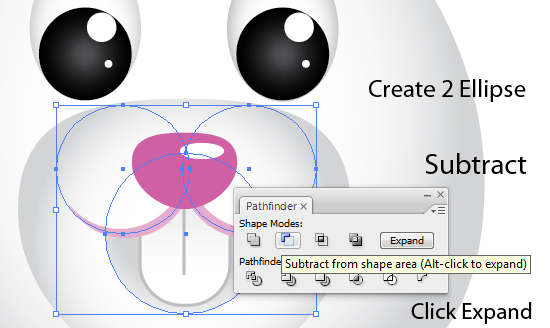
Create 2 Ellipse and try to imitate the Arc on the Mouth Line. On the Pathfinder, Subtract and Expand.
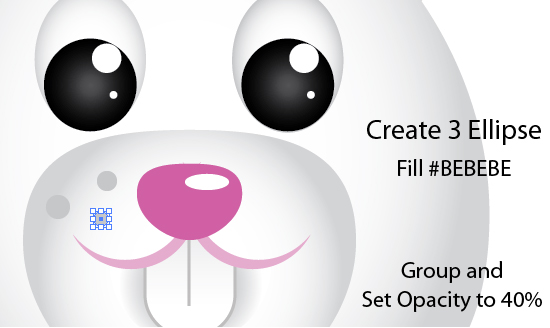
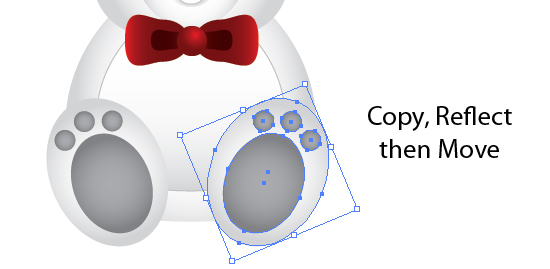
Create 3 Small Elipse with Grey(BEBEBE) Fill. Group them and set opacity to 40%.
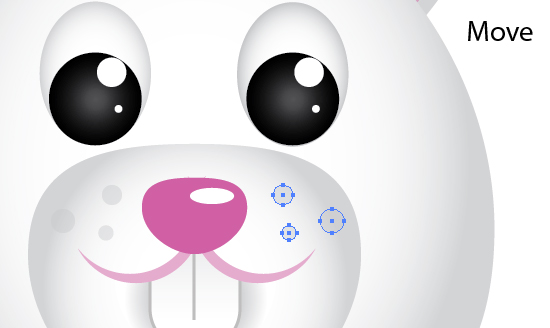
Copy and Transform > Reflect. Select Vertical.

Move it to the Right Cheek.
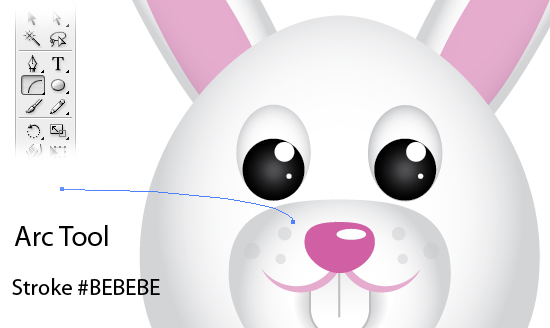
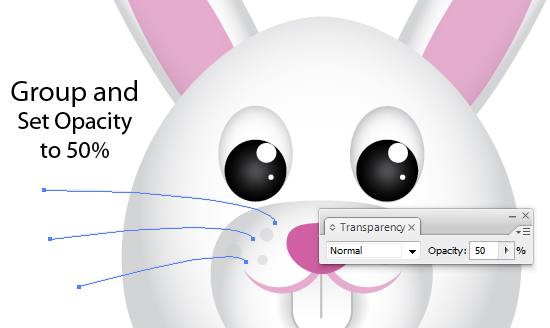
Using the Arc Tool. Create an Arc for the Whiskers. Make the stroke with a Grey(#BEBEBE) color.
Create 3 more by Copying and Free-Transform and Scaling. Group and Set Opacity to 50%.
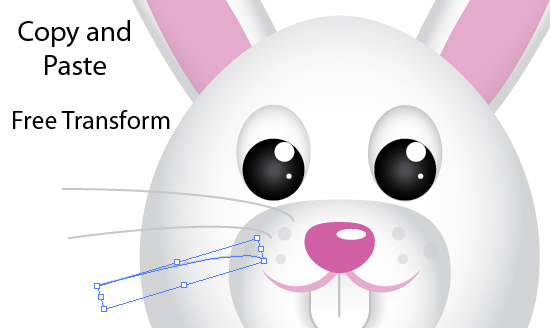
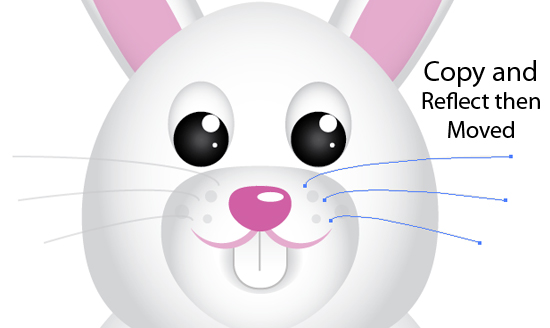
Copy and Reflect Vertically them move to right.
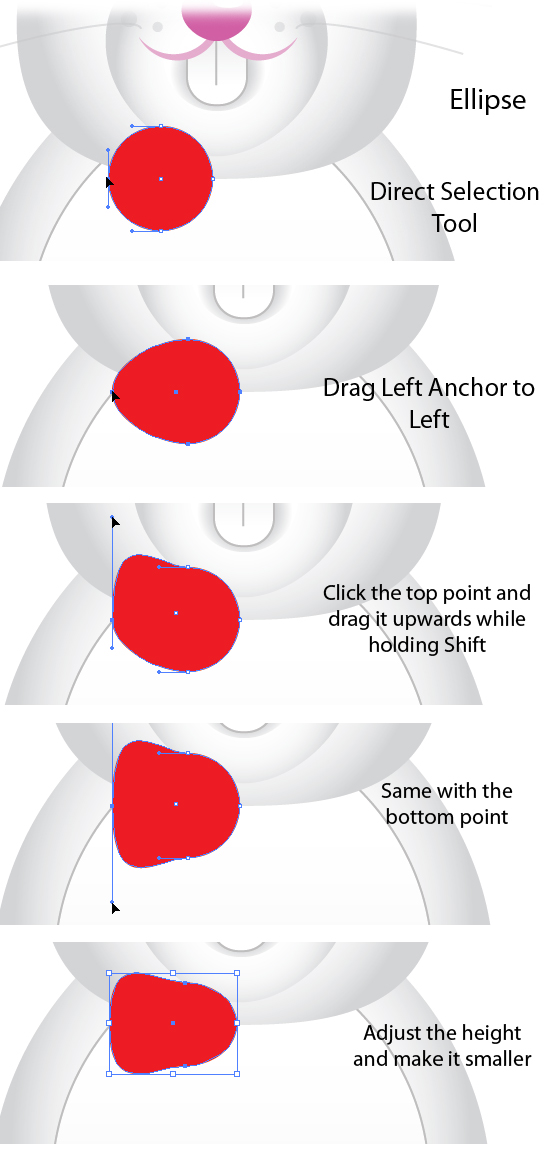
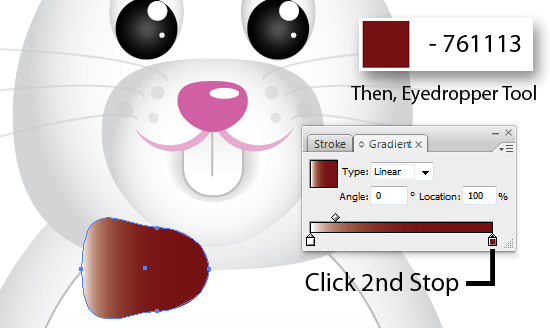
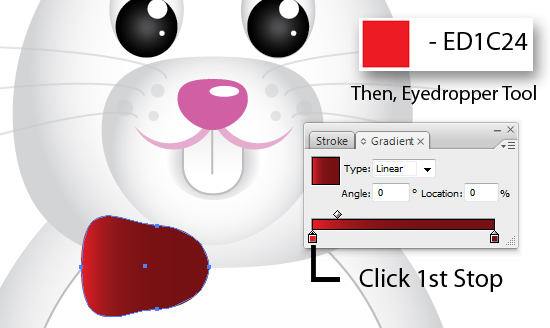
Create an Ellipse with Red Fill. Using the Direct Selection Tool. Drag Left Anchor to Left. Click top Point and drag it upwards while holding Shift. Same with the bottom point. Adjust Height and make it smaller.
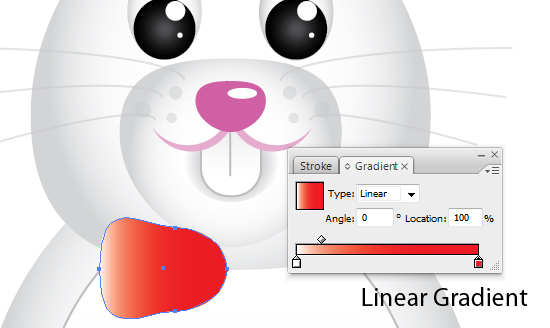
Add a Linear Gradient. Click 2nd Stop, Hold shift and Select the Dark Red from our palletes. Then the 1st Stop, Hold shift and Select the Red Color.
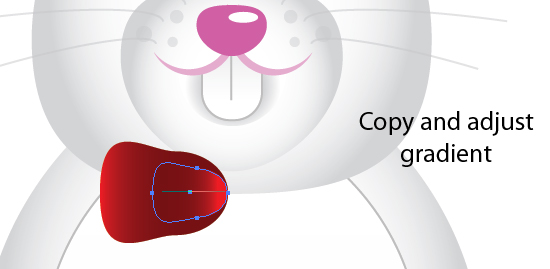
Copy and Scale Down. Using the Gradient Tool, drag from right to left.
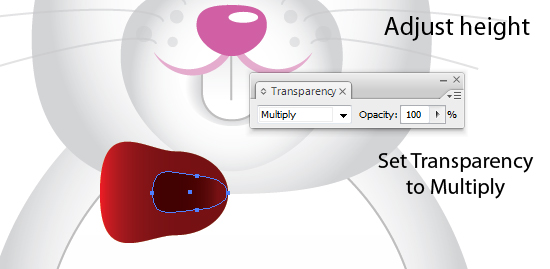
Adjust Height and Set Opacity to Multiply.
Group them and make a copy. Transform > Reflect then move it to the right.
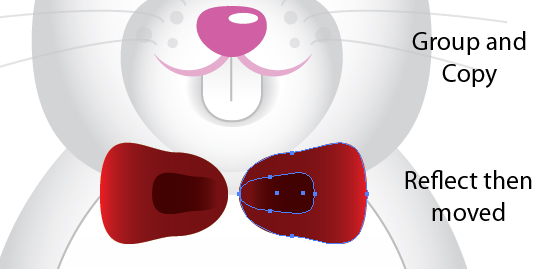
Create an Ellipse, Use the Eyedropper and pick on the Ribbon’s Gradient. Set it to Radial Gradient. Using Gradient Tool, drag from middle top right to bottom left.
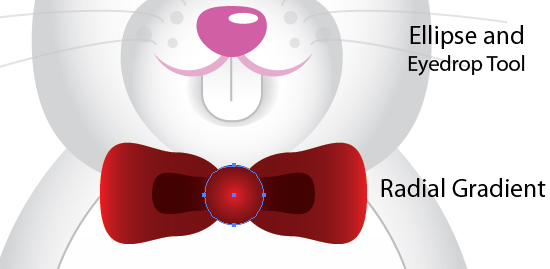

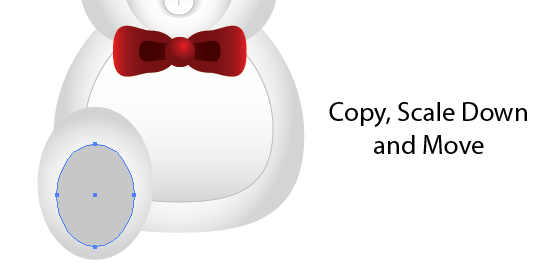
Create an Ellise. Free Transform and using the eyedropper again select on the Body’s Gradient. Adjust midpoint to 74.73%.
Create a copy, scale it down and move a bit to the bottom.
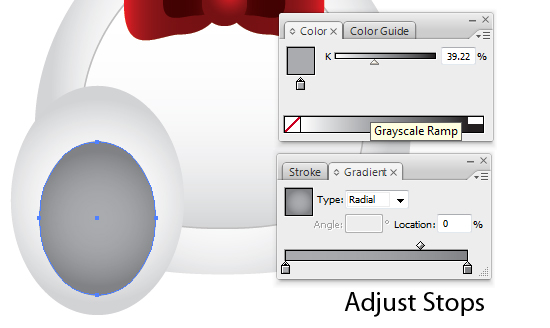
Click on the 2nd Stop and Adjust the Color on the Color Tabs or set it to 39.22%.
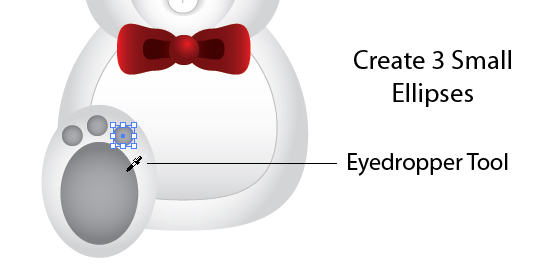
Create 3 Small Elipses and Pick on the Gradient of the Big Ellipse with the Eyedropper.
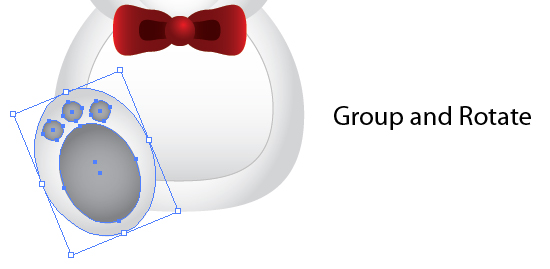
Group them and Rotate Counter-Clockwise. Make a copy and Transform > Reflect and move to the right.
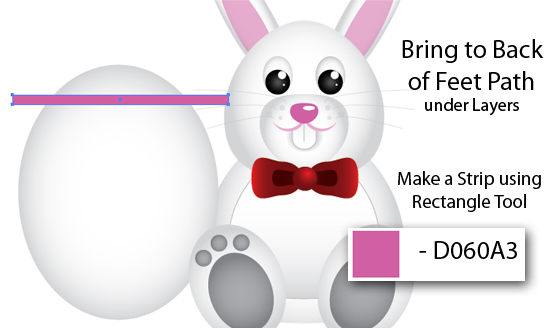
For the Egg, Create an Ellipse. Free-Tranform and make it Narrower. Scale it up to make it bigger.
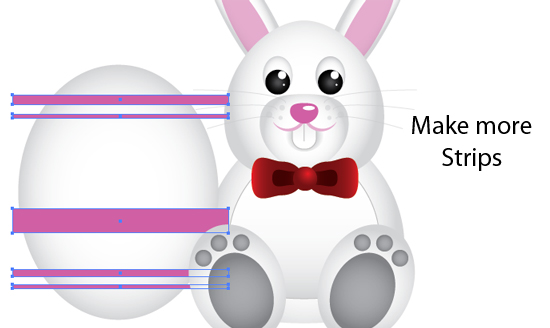
Bring it to back of Feet Path under Layers Tab. Make a strip using the Rectangle Tool. Pick on the Pink Pallete.
Make more Strips and make your own design.
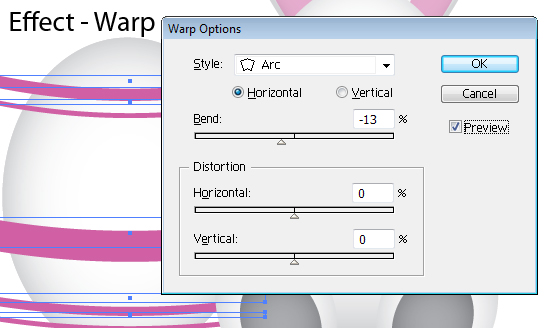
On the menu, Click on the Effect > Warp. Set options to settings below.
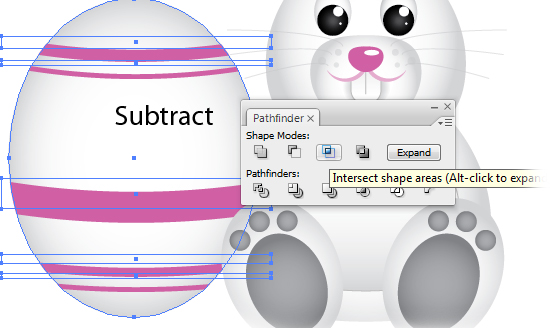
Create a copy of the Egg Shape. Select the New shape and the Strips. Make sure the egg shape is at the back of the Strips on Layers tab. On the Pathfinder, Subtact from shape area.
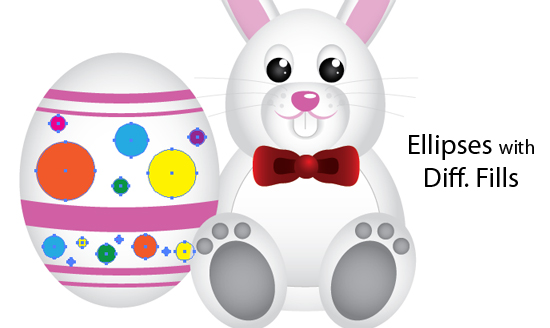
Create Ellipses and go wild with your design and use different Fill Colors.
Create a copy of the Egg Shape and Bring it to Front. Set the Transparency to Multiply.

Using the Rectangle Tool, Create a Box to bound our Illustration. Add a Radial Gradient Fill with a lighter blue and blue Fills. Send it to bottom or back of the Layers under Layers Tab.
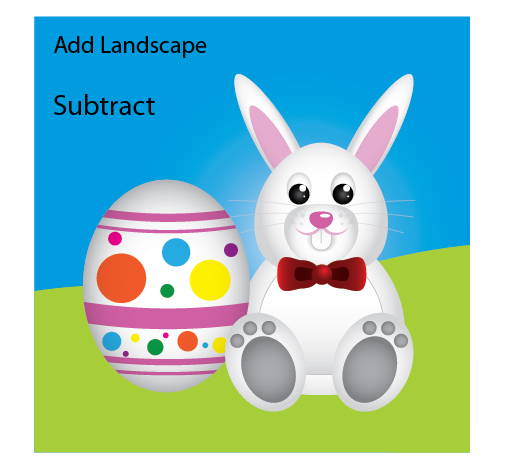
Add a Landscape or some hills. with a Light Green Fill. Dont worry about making excess of the bounding box. Create a copy of the Box and Select the Landscape. On the Pathfinder, click on the Subtract from Shape Area.
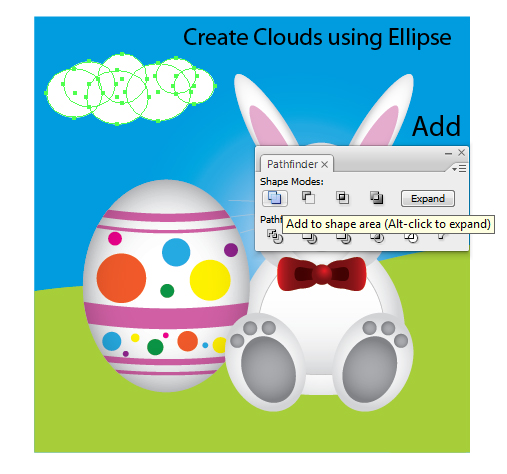
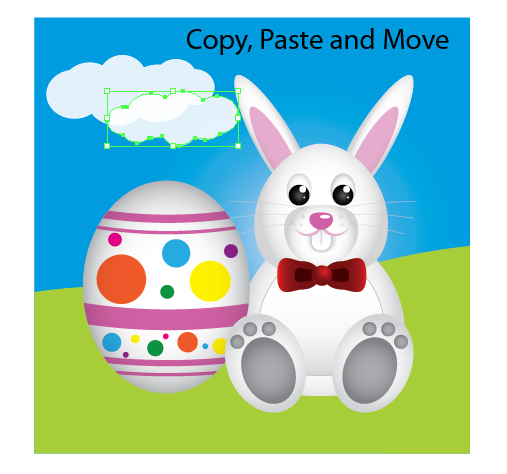
Create Clouds using Ellipses. On the Pathfinder, click on the Add from Shape Area.
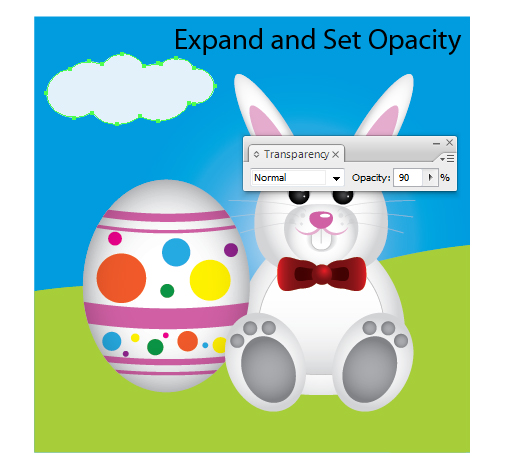
Click Expand and Set Opacity to 90%.
Create a copy, Scale it down and Move it to the bottom right.
Create an Ellipse and add a Radial Gradient just like below. Use the 1st stop and adjust in colors to something darker grey.
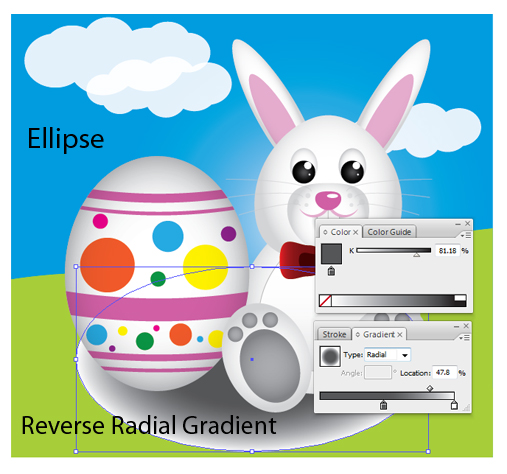
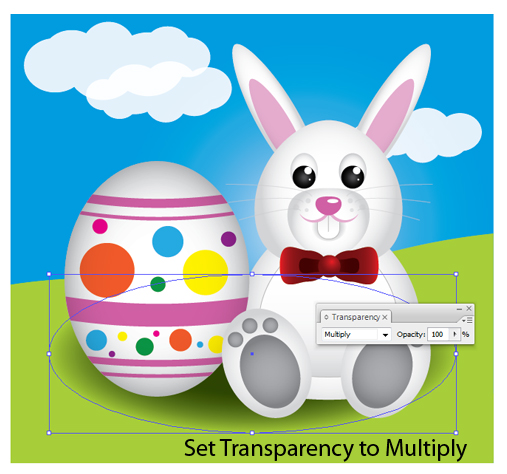
Set the Transparency to Multiply.
Final Image Preview
We’re Done! That was easy wasn’t it? Below is the Final Image I obtained. Enjoy and Happy Easter!
Join 1Y0-A17 web designing course to become expert of this art. Download PMI-001 tutorials and 70-646 demos to learn best web design practices.
 Vexel Art is a style composed of multiple layered shapes and focuses on recreating an imagery using a raster program. The name came from a combination of vector and pixel design. It is an entirely pixel-based raster image that imitates the vector graphics style and not necessarily using Vector Programs.
The general idea is that they are raster images that look much like vector and in most cases are created using the same techniques. It may be composed using vector graphic techniques, however it becomes a vexel when the vector elements are rasterized and further manipulations are done in a raster program.
On this post you will learn how to create your own Vexel graphics through the beginner and intermediate tutorials. Get to know Vexel and apply the technique.
How to Vexel

This tutorial explains the basics about vexeling. It gives practical advice on how to succeed with this art form. Worth reading for the newbie in creating vexel designs.
Create a Complete Vexel Image Using Photoshop

This tutorial will instruct the reader on how to take a picture and create a vexel image out of it, through Photoshop. Numerous vexel techniques are taught. You’ll learn how to use the Pen Tool, and then put it to good use to construct hundreds of shapes that will compose a full vexel image.
Vector/Vexel Art in Photoshop

This is a well-known tutorial that covers the detailed process of converting a photo to a vexel illustration. It shows each main step of creating this graphic with the Pen Tool.
Create a Basic Vexel Image

The tutorial will show how to create a simple vexel image from a picture. Some pattern effects were used to give the image some interesting texture. This is a basic way to create a vexel image using predominately Photoshop’s vector based tools. Will help you master the pen tool.
Something Red Walkthrough

This vexel tutorial has great results. The tut doesn’t cover every detail of creating the design, though. It starts with complete line work. Then it gives an overview of the process of coloring it in a vexel style.
Vexel Tutorial Hair

This tutorial is one wonderful vexel hair tutorial. Every step is thoroughly explained and would be perfect for beginner in vexel art. Gives a really detailed hair output.
Vexelling Hair

This tutorial covers creating a vexel image in particular with the hair. This one uses a brush to come up with a detailed hair.
Vexel Start Tutorial

Another tutorial to help you get up and running with vexel graphics. This one covers using layer opacities, posterize, the Pen Tool, layer setup, and other basic vexel techniques.
Hair Tutorial

This tutorial will show how to create a vexel hair using stroke paths and gradients. Really nice output.
Vexel Eye Walkthrough Tutorial

This basic vexel tutorial shows how to create an eye in this style. It shows how to compose the vexel shapes one group at a time. It covers creating star bursts for the eyes as well.
Vector Car Tutorial

This tutorial shows a step by step guide in creating a vexel car. From linework, coloring, every part of the car and any other details.
Vexel Tutorial Basic Eyes

Another great tutorial on vexelling a basic eye. Shows how the shading goes on greyscale and black.
Create a Vector Style Illustration in Photoshop

In this tutorial, you’ll learn how to create an illustration of a model. We will use Photoshops Burn Tool to add some dimensionality to the illustration.
Become expert in web design art with professional 640-822 web designing course. Download 642-813 tutorials and 642-832 study guides to learn about vexel-art.
Vexel Art is a style composed of multiple layered shapes and focuses on recreating an imagery using a raster program. The name came from a combination of vector and pixel design. It is an entirely pixel-based raster image that imitates the vector graphics style and not necessarily using Vector Programs.